Scan a New Document into a Case
Applies To: Review
Complete the following procedure to scan a document into
a case from the case table (Case View
or related tab). See Overview: Scanning (Case Table) for more information about scanning in the Case View/Case Table.
Scanning a document into the Case, from the Case View/Case Table, is a two-part process
- Scan the document
- Check the document and add it to the case
Click the links below to view the steps to each procedure.
To scan a new document into the case:
-
On the Dashboard, click the Review module.
-
Select a Client and Case and click Open.
-
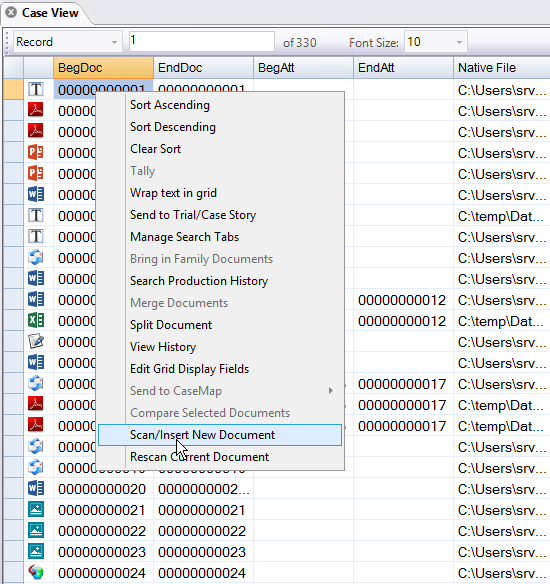
To add a new document, right-click anywhere in the tab and click Scan/Insert New Document
-
Complete the Scan Document dialog box as explained in the following table.
|
Select Scanner
|
Select the scanner to be used and basic scan settings. Available items depend on the capabilities of your scanner.
|
|
Sides
|
|
Color
|
|
Paper Size
|
|
Rotate Images*
|
Select this option to rotate all pages in the document set by 90, 180, or 270 degrees. Rotation is common for certain types of documents, such as spreadsheets or graphs.
|
|
OCR While Scanning*
|
Select this option if you will be creating OCR text. The OCR language is English. (If another language is needed, use the Scanning module instead of this “quick scan” method. See Overview: Scanningfor more information on the Scanning module.)
|
|
BegDoc
|
Displays the image key to be used for the new document:
-
If you are adding a new document, this is the number following the last image key (BEGDOC) in the case.
-
If you are replacing an existing document, this is the image key of the selected document.
New documents only:
-
If the number is acceptable, leave it as-is.
-
To change the image key, enter the needed number in the BegDoc field.

|
NOTE: Do not click the Refresh button,  , unless you want to retrieve the number following the last image key in the case. , unless you want to retrieve the number following the last image key in the case.
|
|
|
* Changes/corrections can be made after the document is scanned, as explained in .
|
-
Click Scan and wait as the document pages are scanned.
-
If you need to add one or more pages to the new (or existing) document (for example, if you are using a single-feed scanner):
-
Add the new page(s) to the scanner.
-
Check/change the settings in the left pane of the dialog box.
-
Right-click the page below which you want to add more pages and select Insert Scanned Image(s).
- After the new pages are added, respond to the message, “Insert More Pages?” as follows:
- If more pages need to be inserted, add them to the scanner and click Yes to continue.
If you have no additional pages to scan, click No.
| NOTE: The message in this step will be repeated each time pages have been scanned; click Yes until no more pages are to be added; then click No. |
-
When all pages have been scanned, check/correct them and add them to your case as described in Check Newly Scanned Document and Add it to the Case.
To check the newly scanned documents, make corrections,
and add them to your case:
-
On the Dashboard, click the Review module.
-
Select a Client and Case and click Open.
-
Right-click anywhere in the Case View tab and click Scan/Insert New Document.
-
In the Scan Document dialog
box, check the list of pages. If pages are missing, add them as explained
in Scan a New Document into a Case in Case View.
-
If OCR was supposed to be
added, check the OCR indicator for each page. It should be Y.
If OCR is missing, add it as follows:
-
For a single page,
right-click the page and select Ocr Current Page.
-
For all pages
in the document, right-click anywhere in the list of pages and select
Ocr
Entire Document.
-
Wait as OCR text
is created. When the OCR process starts and is in progress, the OCR
indicator is Q. When the process
completes, the indicator changes to Y.
-
For each page
that was OCR’ed, click the OCR
tab and examine the result.
-
Click the first page in
the list of pages and examine the image, using the scanning
image toolbar.
-
Continue with the following
steps as needed.
-
To rescan
pages:
-
Load the needed
pages into the scanner.
-
Select the needed
pages in the Scan Document dialog box. For multiple pages, Shift+click
or Ctrl+click pages to select a contiguous or non-contiguous set,
respectively.
-
Right-click and
select Rescan Image(s). Wait
as the pages are rescanned.
-
To delete
pages (such as blank pages):
-
Select the needed
pages in the Scan Document dialog box. For multiple pages, Shift+click
or Ctrl+click pages to select a contiguous or non-contiguous set,
respectively.
-
Right-click and
select Delete Image(s).
-
Check the number
of selected images; if it is correct, click Yes
in response to the confirmation message.
-
When scanned pages are complete
and correct, click Done to
add them to your case.
Related Topics:
Overview: Scanning (Case Table)

 Scan a New Document into a Case in Case View